


by Arman Gungor
My last article was about using the Content-Length header field in email forensics. While the Content-Length header is very useful, it has a couple of major shortcomings:
- Most email messages do not have the Content-Length header field populated
- If the suspect is aware of this data point, the integer value in the Content-Length header field is very easy to modify to make it match the length of the manipulated email payload
Wouldn’t it be great if there was something more widely used and tamper-resistant? Enter DKIM.
What is DKIM?
DomainKeys Identified Mail (DKIM) is an internet standard that allows an entity to assert responsibility for a message in transit. The entity can be the organization of the author of the message, or a relay.
The signing entity hashes the body of the message and digitally signs it along with a subset of its header fields using its private key. The public key of the signing entity is published as a _domainkey DNS TXT Resource Record for the signer’s domain. The recipient can then retrieve the signer’s public key with a DNS query, and attempt to verify the digital signature to determine whether the signature is valid.
TL;DR DKIM gives us the message body and header hashes on a silver platter—digitally signed by the transmitting domain!
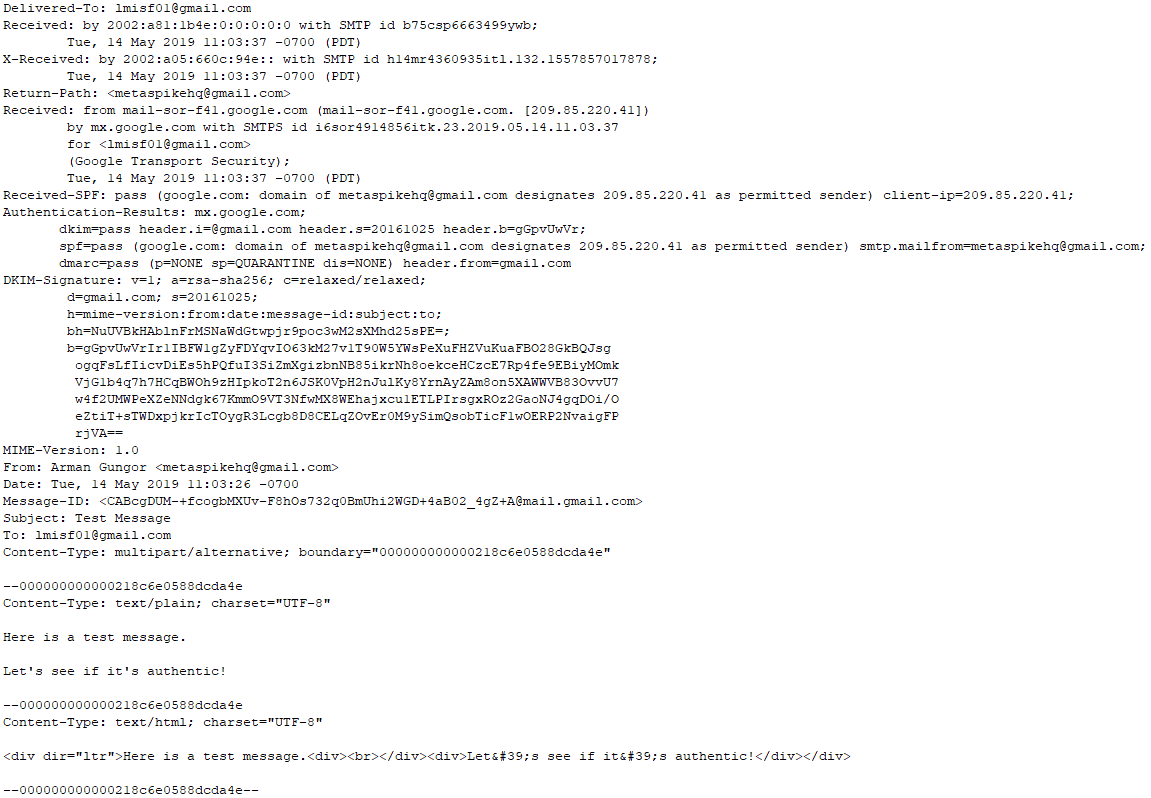
Let’s work through an example and manually verify the DKIM signature. Here is a sample message sent via Gmail’s web interface:

As with many other forensic artifacts, verifying DKIM signatures requires that the suspect message be preserved in its original form. Yahoo and Gmail allow end users to download the raw message via their web interface. In this case, I used Forensic Email Collector to acquire the message in MIME format, which is identical to what we get directly from the provider’s web interface. I’ve then removed a couple of lengthy header fields before taking the screenshot above for clarity.
Let’s start by dissecting the DKIM-Signature header field.
DKIM-Signature
The DKIM-Signature header field contains the signature of the message as well as information about how that signature was computed. Interestingly, the DKIM-Signature header field being created or verified is itself included in the signature calculation—with the exception of the value of its “b=” tag.

The tags of the above DKIM-Signature are as follows:
v= Indicates the version of the DKIM specification. You should expect to see the value “1” in this field as of this writing.
a= The algorithm that was used to create the signature. In this case, it is RSA-SHA256.
c= Indicates the canonicalization algorithms that were used for the header and the body. The canonicalization algorithm determines how the body and the header are prepared for hashing—especially as it relates to tolerance for in-transit modification. We will discuss this further below.
In this case, “relaxed/relaxed” indicates that the relaxed canonicalization algorithm was used for both the header and the body. A single value such as “c=relaxed” would have indicated that “relaxed” was used for the header, and “simple” was used for the body—equivalent to “c=”relaxed/simple”.
d= Indicates the domain claiming responsibility for transmitting the message. This is the domain whose DNS we query to get the public key. In this case, the domain is “gmail.com”.
s= Indicates the selector for the domain. In this case, “s=20161025” indicates that we can query the TXT record for 20161025._domainkey.gmail.com to get the public key.
h= This tells us which header fields were included in the signature. In this case, the list is Mime-Version, From, Date, Message-ID, Subject, and To. We will use the same list of header fields when verifying the signature.
bh= This is the hash of the body of the message after it was canonicalized, in Base64 form.
b= The signature data in Base64 form.
Canonicalization
Let’s go over the two canonicalization algorithms so that we can prepare the header and the body correctly for manual DKIM verification.
Simple Canonicalization
The simple algorithm tolerates almost no modification. For the header, the simple algorithm presents the header fields exactly as they are without changing their case, altering whitespace, etc. For the body, the simple algorithm removes any extra empty lines at the end of the message body.
Relaxed Canonicalization
The relaxed algorithm providers better tolerance for in-transit modification. For the header, the relaxed algorithm converts all header field names to lowercase (e.g., “Subject:” -> “subject:”), unfolds all lines, converts all sequences of one or more whitespace characters to a single space,
removes all whitespace at the end of each header field value, and removes any whitespace before and after the colon that separates the header field name from the value (e.g., “subject : test” -> “subject:test”). For the body, the relaxed algorithm removes all whitespace at line endings and replaces all whitespace within a line with a single space. Extra empty lines at the end of the message body are also removed.
You can find the authoritative documentation with all of the details here: RFC 6376—Canonicalization.
DKIM Verification
Now that we know how to interpret the DKIM-Signature field and how to prepare the body and the header for hashing, we can attempt to verify the DKIM signature manually.
Step 1—Body Hash
The first step is to canonicalize the message body, hash it, and compare it to the value reported in the “bh=” tag. A mismatch here means an instant fail—we needn’t proceed further.
The canonicalized version of the message body, using the relaxed algorithm, looks as follows:

I set my text editor up to show line breaks and spaces for the above screenshot. Note that the CRLF at the very end remains.
When we hash the above text using SHA-256 (based on the value of the “a=” tag) and convert the result to Base64, we find NuUVBkHAblnFrMSNaWdGtwpjr9poc3wM2sXMhd25sPE=. This matches the body hash that was included in the “bh=” tag of the DKIM-Signature header field.
We can already see how powerful this is. The DKIM-Signature header field contains a hash of the message body, which we can verify ourselves very easily without even fetching the public key of the signing entity.
Step 2—Signer’s Public Key
The next thing we should do is to query the signer’s domain and fetch their public key. We will need the d=gmail.com and s=20161025 values for this.
A good resource to use here is the DKIM Record Lookup tool from MxToolbox. When we populate the domain name with “gmail.com” and the selector with “20161025”, we get the following key:

Step 3—Canonicalize The Message Header
In order to prepare the message header for verification, we need to choose the header fields indicated in the “h=” tag in that order, add the DKIM-Signature header to that list (except for the contents of the “b=” tag), and run it through the canonicalization algorithm (relaxed in this case).
Once the above steps are complete, the canonicalized message header looks as follows:

There are a few things to note here:
- The DKIM-Signature header field includes the body hash (the “bh=” tag). So, although we are not including the body itself in the sign/verify process, we are including the hash of the canonicalized body.
- The header field names have been converted to lowercase, and whitespace has been adjusted according to the relaxed canonicalization algorithm.
- There is no CRLF character at the very end of the text, after the “b=” tag.
- The value of the “b=” tag is excluded. This makes sense because the signing entity had no way of knowing the value of the “b=” tag (i.e., the signature data) until after the signature was calculated. So, the value of the “b=” tag could not have been used in the calculation of the signature.
We now pass the canonicalized header above, the public key we obtained in step 2, and the signature provided in the “b=” tag of the DKIM-Signature field to our signature verification function. I used the RSACryptoServiceProvider.VerifyData() method available in .Net for signature verification. You can use an equivalent in your programming language of choice.
The signature verification process determines the hash value in the signature using the public key and compares it to the hash value of the canonicalized message header. In this case, the two hashes match and the signature is verified.
Automation, Anyone?
Although it is great to know how to do so, verifying DKIM signatures manually can get tedious. You can use a number of open-source tools to add some automation to your DKIM verification workflow. If you use Perl, you can check out Mail::DKIM::Verifier. If Python is more your thing, dkimpy is also a good option—be mindful of how multiple DKIM-Signature headers are handled.
What Is The Forensic Relevance?
DKIM signatures give us some very powerful information to work with—the cryptographic hash of the message body and a subset of the header fields, signed by the sending domain. Even if one non-whitespace character changes after the message was signed, the DKIM signature would fail verification. When forensically authenticating an email message, a valid DKIM-Signature header and a verified signature indicate that the message body and signed parts of the message header were not modified after the signing entity calculated the DKIM signature.
Could a suspect work around this? A few ways that come to mind are by gaining access to the signing entity’s private key to sign on their behalf, by manipulating the message body and/or header without changing their hashes (not currently possible for SHA-256), and by removing the DKIM signatures from the manipulated message. The latter is simple to do, but would also be fairly easy to detect when the suspect message is compared to other messages from the same sender within the same time period.
Another security consideration is the use of the “l=” tag. This optional tag in the DKIM-Signature header field indicates the body length that was included in the cryptographic hash. Absence of this tag indicates that the entire body was hashed. If the “l=” tag was used, the suspect could append fraudulent content beyond the hashed subset of the message body without failing DKIM verification. RFC 6376 has a section on Security Considerations which is an interesting read.
Finally, it is important to note the Authentication-Results: header field Gmail inserted into the message upon receipt (see RFC 7601). This header field indicates, among other things, that DKIM verification was successful at the time Gmail received the message, and contains the first 8 bytes of the signature data in the “header.b=” tag. If the message was manipulated, this can be helpful in determining when the manipulation took place.
Conclusions
Forensic examiners should pay close attention to DKIM signatures when authenticating emails. Adding automated DKIM signature verification to your workflow would be a good starting point. If DKIM verification fails, it is important to know why. Was it because the signing entity’s public key is no longer available in their DNS records, or did the body hashes or header hashes not match?
DKIM specification has quite a bit of detail, and most tools I have encountered do not appear to have implemented all aspects of the specification. When working with DKIM, it is important to know the details and be able to perform manual verification as needed, especially to cover edge cases.
References:
RFC 6376: DomainKeys Identified Mail (DKIM) Signatures — https://tools.ietf.org/html/rfc6376
RFC 5863: DomainKeys Identified Mail (DKIM) Development, Deployment, and Operations — https://tools.ietf.org/html/rfc5863
RFC 7601: Message Header Field for Indicating Message Authentication Status — https://tools.ietf.org/html/rfc7601
About The Author
Arman Gungor, CCE, is a digital forensics and eDiscovery expert and the founder of Metaspike. He has over 21 years’ computer and technology experience and has been appointed by courts as a neutral computer forensics expert as well as a neutral eDiscovery consultant.


Hi, I tried to decode this NuUVBkHAblnFrMSNaWdGtwpjr9poc3wM2sXMhd25sPE= and I cannot obtain the SHA256 code, only unprintable chars. I tried to hash (sha256) the body of a gmail e-mail and I cannot get the base64 encoding of the sha256, the lenght is different from all the base64 encoded text in “bh” tag in every mail. In every e-mail the lenght is 44 chars, if I do Sha256 of the body then base64 I get 88 chars len code. So, why if I decode your base64 bh tag value I cannot get a sha256 code? And why if I canonicalize my e-mail body then I do sha256 and then base64 it is not the value contained in bh tag?
Thanks