


by Robin Brocks, IT Forensic Expert and Incident Responder
Only a few years ago, it was a real pain creating a portable Windows on CD/ DVD or thumb drive, because the Operating System was not prepared to run on those media. There have been numerous projects and volunteers, like BartPE or the WindowsFE (Forensic Edition), to make it possible to run a complete OS from removable media, but in every case, this takes time and a lot of customizing.
Nowadays we do not only have Microsoft selling “Windows to Go”; it is easier than ever to create an own version of a portable Windows, together with everyone`s favorite tools, script or frameworks like Java or Python! Having a portable Windows 10 at your hand has some valuable advantages:
- Booting a Windows OS with a huge integrated database of device drivers gives you instant access to all common consumer hardware
- Forensically sound read-only access and read-write operations are possible
- Access to all hard drives with NTFS (and FAT of course) file systems, even if they are protected by Bitlocker encryption
- Integration of your preferred tools and scripts is very easy, you only have to copy them
- Widely used software like FTK Imager, OSForeniscs, X-Ways Forensics and a lot of others all run smoothly inside Windows PE
Using your own Windows 10 PE version, customized with your favorite tools and scripts, gives you instant access to any filesystem on the device on which you are booting up your removable media. I do not recommend using such a Windows PE as your primary Digital Forensics toolset. It is not a replacement for a dedicated Forensic Workstation in your Lab or the expense for a physical Writeblocker. The great advantage of Windows PE on a USB thumb drive is speed! If you need urgent access to drives and files without tampering with any file stamps, such a toolset is for you. The most useful steps you can accomplish with Windows 10 PE are file carving, file extraction, malware analysis and investigation of all file-based artifacts.
Installation and Customization
First, I will describe which software from Microsoft you need to create your own Windows 10 PE media, how to install it and configure it for digital forensic purposes. Once everything is prepared, it’s child’s play to add your personal selection of applications and scripts for digital investigations.
Assuming you are running Windows 10, you must download the suitable version of the “Windows Assessment and Deployment Kit” from here.
On this website, you will find versions for Windows 10 with build numbers 1511 and 1607, so make sure you pick the right one. Download the “Windows ADK for Windows 10” setup file with the name adksetup.exe
The corresponding MD5 hash values are:
Version 1511: 760e0dcc3440756ebe1657dc43ca6ef1
Version 1607: 3da6239a8d2039cb8eec7c831b9c664a
Run the setup file with administrative permissions. When it comes to the selection of the program features, you should select at least the options shown in the following screenshot. The setup program installs Windows PE in 32-bit and 64-bit flavor. Leave all other options as their default values, especially the suggested file paths.

During this article, we will create a Windows 10 PE media in 64 bit. You can start the Deployment console from the menu entry Start – Windows Kits – Deployment and Imaging Tools Environment with a right-click on Run as Administrator. This is a shortcut to a batch file in the programs folder, which sets several important variables and opens a command prompt. We will use this command prompt until all tasks are accomplished; it stays open all the time.
First we create a folder for the necessary files and copy them all in one step with:
copype amd64 C:\WinPE_amd64
followed by the matching command to mount the boot.wim file
Dism /Mount-Image /ImageFile:”C:\WinPE_amd64\media\sources\boot.wim” /index:1 /MountDir:”C:\WinPE_amd64\mount”

Your next step is to decide if you want your Windows 10 Preinstallation Environment to mount other drives than your boot drive in read/write mode or not. Just set the appropriate number as the last digit. 1 means “mount all drives writeable”, 2 means “mount all except those drives on a shared bus”, 3 stands for “do not mount anything in read/write mode” and 4 means “set internal disks offline”. We proceed with number 3 since we are doing digital forensics and do not let Windows decide which drive to mount as writable automatically.
The built-in tool diskpart.exe allows changing this behavior once Windows 10 PE is running; we will come to this topic later. Now we copy to the console window
Setsanpolicy C:\winpe_amd64\mount 3
Now it is time to add useful packages to the media. I have selected a subset of suitable packages for digital forensics and created a file with simple command strings to add them all to the PE media. These command strings add the mentioned packages in the right order and meet all dependencies. To keep this text short and readable, I have copied these command strings to Pastebin at http://pastebin.com/4JYijWyZ.
You can copy the entire text from the Pastebin and paste it to the command shell. The Windows program Dism.exe (Deployment Image Servicing and Management tool) installs all packages one after another as a batch job!
Adding these packages and the corresponding language packs takes 5- 10 minutes and when this is done, we have integrated support for:
- WMI and WMIC
- .NET 4.5 Framework
- Powershell, the Windows Scripting Host and HTA applications
- Access to Bitlocker encrypted drives (if you have the password, of course)
Language Support
At the moment, we have a Windows 10 PE in US English language and very soon the OS starts running with a US keyboard layout. For any other language support, please have a look at:
C:\Program Files (x86)\Windows Kits\10\Assessment and Deployment Kit\Windows Preinstallation Environment\amd64\WinPE_OCs
It contains subfolders named after the matching language and country. You can add a lot more language packages by adjusting the path to the *.cab file and Dism.exe to install them. French language support for Powershell? Not a problem!
Dism /Add-Package /Image:”C:\WinPE_amd64\mount” /PackagePath:”C:\Program Files (x86)\Windows Kits\10\Assessment and Deployment Kit\Windows Preinstallation Environment\amd64\WinPE_OCs\fr-fr\WinPE-PowerShell_fr-fr.cab”
These few characters will do the job! And again, copy and paste it to the command shell in one piece. The Dism.exe tool has a lot of of options for localizations: you can set your locales, keyboard layouts and UI languages. A full reference for this tool is here. This reference is very valuable, especially if you need support for Asian languages. The following command, for example, will set the input locale to German:
Dism /Image:”C:\WinPE_amd64\mount” /Set-InputLocale:de-DE
And this one sets all possible language options to French:
Dism /Image:”C:\WinPE_amd64\mount” /Set-AllIntl:fr-fr
Adding your preferred Digital Forensics Toolset
At this point we could close the image, copy it, or burn it to USB or DVD, and boot a minimized version of Windows 10. But now comes the highlight – we can add our tools for Digital Forensic investigations!
First, create the folder “tools” with
mkdir C:\WinPE_amd64\mount\tools
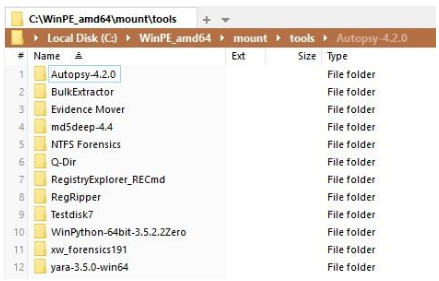
and now you can copy all your tools to this folder. In this example, we will copy several tools and application suites to this folder. The most useable applications are portable applications, but copying not-customized tools from a “Program Files” folder is often successful. After Windows 10 PE is booted, there will only be the typical DOS-like command prompt instead of the known Windows Desktop. I recommend copying a file manager like Q-Dir to the tools directory to be able to browse your toolset with a GUI. Since we are using the 64-bit version of the Preinstallation Environment, it only makes sense to copy 64-bit applications to the tools folder. The next screenshot shows an example of well-known tools for digital forensics. At this point I would like to recommend that every investigator think of their own toolset and test applications that they usually utilize for digital forensics.

Okay, we now have a usable toolset for an investigation of hard drives and artifacts. Their processes are started later from the Windows 10 PE kernel and can access an underlying hard drive and any files on it. Time to finish the build process and boot up. Dismount the image and commit all changes with the command:
Dism /Unmount-Image /MountDir:”C:\WinPE_amd64\mount” /commit
This will last several minutes, depending on the size of your added additional tools. Meanwhile Dism.exe shows a simplified progress bar as entertainment.

Write this file to a USB thumb drive with the following command, where D: is the drive letter for your USB device:
MakeWinPEMedia /UFD C:\WinPE_amd64 D:
Or create an ISO file, which can be booted for testing purposes by any virtualization software like VMWare or VirtualBox and later burned to DVD. In this case, copy this command to the command prompt:
MakeWinPEMedia /ISO C:\WinPE_amd64 C:\WinPE_amd64\WinPE_amd64.iso
After creating a bootable USB thumb drive or ISO file, you can close the command prompt.
Booting, Mounting, Carving
It’s time to boot! I strongly recommend playing around with Windows 10 PE as an ISO file at the beginning and starting it inside a virtual machine. You should get used to working with built-in tools like diskpart, wpeutil and your personal toolset for digital forensics before working on real cases.
Insert your USB thumb drive, put the DVD into the matching bay or configure VirtualBox to boot from your fresh made ISO file. Windows now starts and instead of using the common shell explorer.exe you can see a command prompt instead. This is the primary shell. If you close this window, Windows 10 PE will reboot, even while other applications are running. You have been warned!
The good news: most of the tools programmed for 64-bit Windows will run. I could successfully run:
- X-Ways Forensics in version 19.1
- Jesse Kornblum’s md5deep to hash files recursivly
- The 010 Editor in its trial version
- Several tools from Joakim Schicht for carving out MFT files and other NTFS artifacts
- And a lot more software
Java-based software is very slow when started in this environment. Executing Autopsy or the Bulk Extractor Viewer (BeViewer), for example, is possible, but speed is a real pain.
.NET support was already added by installing the predefined packages script.
Python is running, too. I have successfully tested WinPython in 64-bit. In its subfolders you can find several batch scripts for registering this application as Python handler for *.py files.

Drive Access and Bitlocker
The commandline tool diskpart.exe offers you a complete interface for managing your hard drives. Just type diskpart at the command prompt to open this interactive shell. How to make a single drive writable is explained in detail in the Microsoft Knowledgebase.
Access to Bitlocker is realized with manage-bde. It is a tool you might know from the real Windows 10 Operating System and it runs smoothly in a PE environment. It allows you to decrypt encrypted hard drives, change passwords for Bitlocker, and accomplish several other tasks. And again, Microsoft has a nice documentation for its own tool here.
Network Support
Windows 10 PE does not have its networking capabilities enabled at boot time. Here wpeutil enters the game. This is a designated tool for managing the Windows Preinstallation Environment. To start the networking support for IPv4 and IPv6, type
wpeutil InitializeNetwork
That’s all. The network support then starts and the DHCP client broadcasts for a valid IP configuration in the local network. You can query the current network status with
netsh interface ipv4 show config
to get the descriptive name for all Ethernet devices. If you need a static IP configuration for network communications, the tool netsh.exe and the name of the Ethernet device are necessary.
This is an example how to set a static IP address, subnet mask and IP gateway.
netsh interface ipv4 set address name=”Ethernet” static [IP Address] [Subnet Mask] [Gateway]
Once a network connection into your LAN is established, you can map a network drive with net use and save found evidence to a network share. From now on all networking capabilities of Powershell, Python, WMIC and other frameworks can be used. Please consider the command
wpeutil EnableFirewall
if you have a direct internet connection. wpeutil carries out other tasks like rebooting Windows PE, creating a pagefile and various other settings. It allows you to change the UI to non-English languages and keyboard layouts at runtime. This is the difference between Dism and wpetutil: to configure locale and language settings in advance, use Dism. For changes at runtime while Windows PE is running, wpeutil is the tool of choice.
Common Errors
The most common errors I encountered during the overall process were:
- Missing Administrator permissions
- Wrong paths to the *.cab file
- Missing “” quotation marks in conjunction with empty spaces in a file path
Some of your tools do not run because they need a writable disk and we currently do not have one. The ISO file is a read-only file and we used “SanPolicy 3” to keep all fixed hard drives (except the boot drive) in read-only mode. Your tools might run, if you map a read / write network drive and copy them over and start them. Or you use the command
setsanpolicy C:\winpe_amd64\mount 1
when creating the PE media. But in this case do not forget that Windows will mount all drives in read / write mode and might tamper the boot record of attached hard disks. If you have any problems with the Dism.exe tool, you can find debugging information at C:\Windows\Logs\DISM\dism.log
Conclusion
Having a bootable Windows with your favorite tools at your hand gives you very fast access to hard drives on the laptop or PC you are booting. As always, you should know all your tools and what they do to maintain the integrity of all evidence you find and extract. Especially in incident response scenarios, where time is essential and you won’t have to present evidence to a court, a prepared Windows 10 Preinstallation Environment media is very valuable. Properly prepared, your own Windows 10 PE could become one of your most valuable tools for malware hunting.
About the Author
Robin Brocks (GCFA, CISSP) is an IT Forensic Expert and Incident Responder. He has been working in the field of IT Forensics for the last eight years and is an experienced IT Architect, Trainer and Consultant in the IT Business since 1998. You can get in touch with him on LinkedIn.


The tools I ad in \mount\tools aren’t integrated on de FE CD
Wow just wow , thank you for the info. just one question. to install the 64 bit winpe do I need an AMD processor, I have an i5 desktop when I try says I do not have the correct architecture.
I figured it out, I needed to run from the deployment tools command prompt
in the 64bit winpe I could not get portable apps to work, bitlocker worked though. so on a 64bit windows 1607 I installed the x86 winpe and made a 32 bit version all my apps work and bitlocker….thank you for your article
I also built the 64bit version and ran into the same issue. Have you tried the 32bit version on a Surface? I have read that it is a 64bit UEFI and will on boot 64bit OS… therefore I don’t think some of the tools I use could ever work with winPE, any suggestions?
I know I am late to this post.
Thank you for sharing this. I was able to successfully create my .iso and bootable USB. Got my tools and after battling with dependency issues, managed to get the newest version of FTK working. My issue now is that all media is Write-Protected and I have been unable to clear that attribute using Diskpart.
I used set SAN policy as 3 during the WinPE build so everything is read-only. I am able to see the disks as offline, and I can bring them online, but when I try to clear the readonly attribute, I get an error that Diskpart was unable to clear attributes.
I have researched and tried changing the SAN policy to 4, bringing online…etc, but still get the same error. All disks show to be read only, but I seem to be unable to access external media as Read/Write, which I need in order to dump data to it.
Any insights as to what I may be missing?
Thanks!