Oleg Afonin, Danil Nikolaev, Yuri Gubanov
© Belkasoft Research 2015
While Windows desktops and laptops are relatively easy to acquire, the same cannot be said about portable Windows devices such as tablets and convertibles (devices with detachable keyboards). Having no FireWire ports and supplied with a limited set of external ports, these devices make attaching acquisition media more complicated in comparison to their full-size counterparts. Equipped with soldered, non-removable eMMC storage, Windows tablets are extremely difficult to image while following the required forensic routine. Finally, the obscure Windows RT does not allow running unsigned desktop applications at all while restricting the ability to boot into a different OS, making forensic acquisition iffy at best.
In this article, we will have a look at how Windows-based portable electronic devices are different from traditional laptops and desktops, review new security measures and energy saving modes presented by Windows tablets and discuss hardware, methods and tools we can use to acquire the content of their RAM and persistent storage.
Security Model of Windows Tablets
Tablets running Windows 8, 8.1 and Windows RT are designed with certain security measures to prevent unauthorized access to their content if a device is lost or stolen. These security measures are similar to those present in desktop devices, and differ significantly from the approach employed by Google and Apple.
In Windows 8 and 8.1 installed on a tablet, security measures include optional whole-disk encryption (with BitLocker) and Secure Boot, an option to prevent booting into a non-recognized (unsigned) OS, effectively preventing the use of Linux-based bootable drives often used for digital forensics.
Note that Secure Boot is optional, but is often activated by default in the system’s UEFI. BitLocker keys can be retrieved from the user’s Microsoft Account (http://windows.microsoft.com/recoverykey) or extracted from a memory dump (if captured while the tablet is running).
Secure Boot
Secure Boot, even if activated in the tablet’s UEFI BIOS, can usually be disabled by booting into UEFI (by using the combination of Volume-DOWN and Power keys). However, if UEFI BIOS is protected with a password, resetting the password could be difficult. Notably, Secure Boot does not prevent booting from external media per se. If you have a bootable recovery image of Windows 8.1 or a bootable Windows PE 5.1 flash drive, these already carry the required signatures and can be used to start the tablet even if Secure Boot is enabled.
It is important to note that Secure Boot is permanently activated on Windows RT devices such as Microsoft Surface RT, Surface 2, Nokia Lumia 2520 and other RT-based tablets. Since these ARM tablets are locked with Secure Boot, and there is no way to disable that option, there is no known method to boot them into anything other than Windows RT or its recovery image. While one can technically use a Windows RT recovery image such as one provided by Microsoft (http://www.microsoft.com/surface/en-us/support/warranty-service-and-recovery/downloadablerecoveryimage), there are no forensic tools available for that OS. However, one can still use a built-in DSIM tool to capture the content of a Windows RT computer but that is out of the focus of this article.
BitLocker
BitLocker is an essential part of Windows security model. On many tablets, BitLocker encryption protects the C: partition. By default, BitLocker is activated on all Windows RT and many Windows 8 and 8.1 tablets. With BitLocker, one cannot access encrypted partitions without either logging in to Windows (by supplying the correct login and password) or providing the correct Recovery Key. This especially concerns situations with booting from an external device.
If the user’s BitLocker Recovery Key is unknown, it can be retrieved from https://onedrive.live.com/recoverykey (providing that the user’s Microsoft Account credentials are known).
Drives protected with BitLocker will be unlocked automatically every time the user logs in. As a result, if you have the user’s local login credentials for the given device, BitLocker does not represent a major problem.
Important note, however : If the Windows tablet you are about to acquire is running, or if it is in the Connected Standby mode, DO NOT TURN IT OFF before trying anything to capture the system’s live memory dump. If the C: partition is protected with BitLocker, capturing a live memory image is your chance to obtain (and retrieve) the binary key used by BitLocker to decrypt information. If you are able to extract that key, you will be able to use a tool such as Passware Kit Forensic to mount BitLocker-protected partitions even if you know neither the user’s login and password, nor Microsoft Account credentials.
Note that BitLocker is frequently disabled by default on cheaper, mass-produced tablets with smaller screens such as those running Windows 8.1 with Bing.
eMMC Storage
Most Windows tablets are equipped with built-in non-removable eMMC storage. Physically, an eMMC module (Embedded Multi Media Card) is a BGA chip that is soldered onto the main board. As such, standard acquisition methods involving the use of a write-blocking SATA imaging device are not applicable.
In order to acquire partitions from eMMC storage, you will need to boot from an external drive containing a bootable recovery image (such as Windows PE) and a set of forensic imaging tools. However, even that may present a problem with Windows tablets.
Compatibility
Some Windows tablets are equipped with 32-bit UEFI ROM, while few other devices come with fully featured 64-bit UEFI. As a result, you may be unable to boot a 64-bit Windows PE image (or 64-bit Linux) even if the tablet is equipped with a 64-bit capable CPU.
UEFI Secure Boot
The majority of Windows tablets come with the Secure Boot option activated in their UEFI BIOS. Contrary to popular belief, you will NOT need to disable Secure Boot in order to start the system from an external device, PROVIDED that the OS you are about to boot is signed. In other words, you will be able to boot into a Windows 8.1 Recovery and Repair Environment (WinRE) or use a custom Windows PE 5.1 image. However, with Secure Boot activated, you may be unable to boot into a Linux-based forensic image.
In order to disable Secure Boot, you will need to access the system’s UEFI by pressing and holding the Power-DOWN key while starting the device. However, access to Secure Boot is not required if you simply want to boot from a USB device containing a Windows PE or WinRE image.
Booting from an External USB Device
In order to boot from an external USB device, you’ll need to have a properly prepared WinRE or Windows PE based bootable media and a USB OTG (On-The-Go) cable. In order to change the boot sequence and make the system start from an external device, follow these steps:
- Start the tablet.
- At the login prompt, tap the Ease of access icon.
- Select On-Screen Keyboard.
- Tap the Shift key, the shift key should remain lit.
- In the lower right corner, tap the power key and select Restart.
- When the unit reboots, select the Troubleshoot option.
- From here select Advanced options.
- Select UEFI Firmware Settings. You will be transferred into UEFI BIOS.
- From there, change the boot order to allow starting from a USB device.
- If you are using a non-Windows PE (or WinRE) based image, disable the Secure Boot option. There is no need to touch this option if you are using a Windows PE 5.1 image.
- Connect a bootable USB device via a USB OTG adapter.
- Save settings and reboot. The system will start from the bootable image on your USB drive.
- Follow the acquisition routine of your forensic toolkit.
Capturing a Memory Dump
Capturing a RAM dump of a Windows tablet is essential for digital investigations, and is one of the recommended practices by ACPO Guidelines. Most principles of capturing a live memory dump remain the same as compared to full-size PCs. The goals, tools and the process of capturing volatile memory images are described in Belkasoft whitepaper “Catching the ghost: how to discover ephemeral evidence with Live RAM analysis”.
However, there are minor differences between capturing volatile memory images on a PC and doing the same on a small tablet. One thing to consider is the lack of expansion ports such as FireWire on most tablets, which makes the FireWire attack impossible. Moreover, there is usually no possibility to add a FireWire port via an add-on card.
As such, on Windows tablets (with a notable exception of Windows RT devices) we are limited to using software tools such as Belkasoft Live RAM Capturer.
Since most Windows tablets lack full-size USB ports, you will need to use a USB OTG (USB On-The-Go) adapter in order to connect a flash drive. Since tablets are usually equipped with one or two gigabytes of RAM, even a small USB stick or memory card will suffice.
Analyzing a Memory Dump
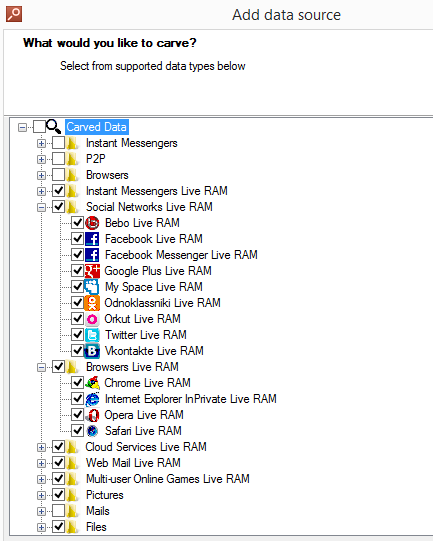
Once RAM is acquired, you will need to analyze it with a forensic tool equipped with a Live RAM dump analysis feature, like Belkasoft Evidence Center:
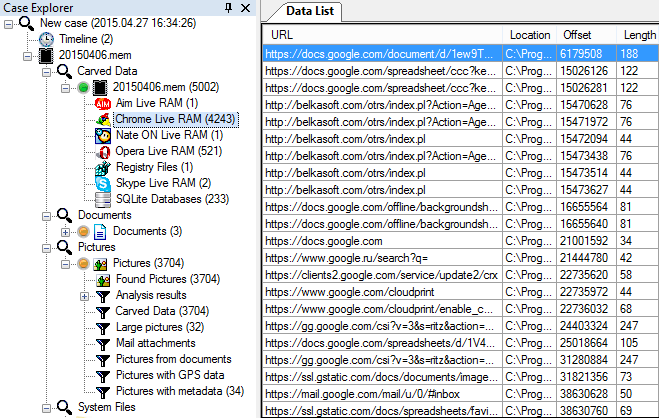
There is a high chance of finding various forensically important artifacts. You can see some data found inside RAM dump by Evidence Center:
Conclusion
To conclude, acquiring Windows tablets is similar to dealing with full-size PCs, yet the process has its share of obstacles. We learned how to image partitions saved on soldered eMMC chips and how to deal with BitLocker protection. We figured out the meaning of Secure Boot, when and how to deactivate it if required. Finally, we reviewed steps to access the tablet’s UEFI BIOS and change device boot order in order to allow booting from a USB flash drive containing a set of forensic tools for imaging the device.
About the Authors
Oleg Afonin is Belkasoft sales and marketing director. He is an author, expert, and consultant in computer forensics.
Danil Nikolaev is Belkasoft sales and marketing manager, co-author, and content manager.
Yuri Gubanov is a renowned digital forensics expert. He is a frequent speaker at industry-known conferences such as CEIC, HTCIA, TechnoSecurity, FT-Day, DE-Day and others. Yuri is the Founder and CEO of Belkasoft, the manufacturer of digital forensic software empowering police departments in about 70 countries. With years of experience in digital forensics and security domain, Yuri led forensic training courses for multiple law enforcement departments in several countries. You can add Yuri Gubanov to your LinkedIn network at http://linkedin.com/in/yurigubanov.
Contacting the authors
You can contact the authors via email: research@belkasoft.com
Follow Belkasoft on Twitter: https://twitter.com/Belkasoft
Subscribe to the blog: https://belkasoft.wordpress.com
About Belkasoft Research
Belkasoft Research is based in St. Petersburg State University, performing non-commercial researches and scientific activities. A list of articles by Belkasoft Research can be found at http://belkasoft.com/articles.